Download MyDefrag-v4.3.1.exe

One of my favourite defragmentation tools MyDefrag (formerly known as JKDefrag) has long ago stopped development and recently the website has also gone down. However the software is still fully functional and as useful as the day the bread was baked.

MyDefrag was maintained for years as an excellent, free defragger. It’s essentially feature complete and just kept on ticking, but after a problem with the mydefrag.com hosting Jereon decided to let the site close.

In his final post on the former official MyDefrag forum he said he hopes that free software download sites keep serving it up for download – I’ve not found it terribly easy to find so I’m hosting my own mirror here for my own benefit and yours.

Download MyDefrag

MyDefrag Download Verification

You can pop the download URL into VirusTotal.com to do an online-virus scan for some reassurance: https://www.virustotal.com/en/

  • EXE: http://patabugen.co.uk/wp-content/uploads/MyDefrag-v4.3.1.exe
  • ZIP: http://patabugen.co.uk/wp-content/uploads/MyDefrag-v4.3.1.zip

Unfortunately I have no other way to prove that the exe is not the original and untouched download from the original site (I made the zip myself) – since there isn’t a checksum listed and available via archive.org. You’ll just have to take my word for it I’m afraid. I’m hosting a MyDefrag download because I love the software, use it frequently (and recommend it in my guide to cleaning your own computer)

Thanks Jereon!

This feels like an appropriate place to put a sincere thank you to Jereon for his years of time and effort to make MyDefrag! The donate button has died with the website, if you didn’t have a chance to donate before and find a way for people to donate now let me know in the comments so we can keep the money-sharing-love alive.
Tags:
Categories:

Kindu Klub Collection

At the end of this month I’ll be going to Ethiopia to spend a couple of weeks with a youth group who work with children in Gondar to support them through life and school.

It’s a super project, you can read more about them here: http://kindutrust.org/projects/kindu-klub/

I’m also in the process of trying to get in touch with some Scouts over there too!

Love Football?

One of the things the children love most is a passion shared by many here in the UK too. Football!

If you have any spare football related items in need of a very worthy new home please let me know! The club are trying to setup a football team and could really use some football shirts, boots or other clothes.

Not into Football?

If your wardrobe, like mine, isn’t packed full of old football stuff it would also be really useful for me to take any of your spare:

  • Laptops – help share the joys and opportunities of IT and the Internet
  • Shoes – Of any shape, size or colour
  • Hygine Stuff – New/Spare Tooth Brushes, toothpastes, flannels, towels etc

Already Decluttered?

Good for you for not keeping stuff you don’t need! If you’d still like to help, you can donate some cash which I’ll pool together to purchase the items most required!
Please get in touch if you have anything you can offer and we’ll work out drop offs or collections!

All the little things from all the good people will add up to make a difference 🙂

WordPress Command Line Script Boilerplate

Recently I had a client who wanted me to import their posts from BlogSpot on to the shiny new self hosted WordPress I’d built for them.

The official importer is OK, but it didn’t do everything we wanted. Specifically not all images had featured images, and those which did often had a copy of the image in the body as well as the featured image. What I needed was a script to go through all the posts, find an image, sideload it so it’s no longer hosted on Blog Spot and set it as the featured image then remove any other images from the post using a Composer package.

I’m not going to share all those tasks here, but below you’ll find a boilerplate script which should give you everything you need to run WordPress admin operations on a selection of posts. Getting access to the Admin functions is a little more complicated than not since it includes all the plugins/admin side things and their baggage.

This is a CLI script designed to be run from the command line, but you could probably adapt it to run through Apache if you had reason to do so.

If you saved this as ‘update_everything.php’ in a ‘scripts’ folder which lived next to your ‘public’ folder (which contains WordPress) you’d run `php scripts/update_everything.php` to use. No output from the script indicates success (unless you modify it to output something).

<?php
// DO NOT RUN THIS SCRIPT without a modifying it, backing up and testing it first.

// This script assumes it's saved in a folder called `script`s and you have
// the following directory layout:

// Soil plugin breaks on CLI, so hack these into place for it. You don't need
// these if you only have well written plugins installed.
$_SERVER['SERVER_NAME'] = '';
$_SERVER['SERVER_PORT'] = '80';

// Give us all the errors!
if (!defined('WP_DEBUG')) {
 define('WP_DEBUG', true);
}
// Include these so we can access all the wordpress bits.
// Change this path to point to wp-load.php, after that we can use ABSPATH
include_once __DIR__.'/../public/wp-load.php';

// These specific includes may vary depending on which bits of admin you need
// you could load admin.php to load everything, but then you'll need to work
// around every not-well-written plugin (see below).
// Look up the function you want in the WordPress docs and it will tell you which
// file it's located in - add that file here. If you then get a "fu
require_once(ABSPATH . 'wp-admin/includes/media.php');
require_once(ABSPATH . 'wp-admin/includes/file.php');
require_once(ABSPATH . 'wp-admin/includes/image.php');

// This SEO Recdirect plugin doesn't play well when you're updating but not
// including every field. You may need to add/remove from these remove_action
// calls or disable other bits of plugin if they're causing trouble.
remove_action( 'save_post', 'seo_redirect_save_current_slug' );
remove_action( 'save_post', 'seo_redirect_save_postdata' );

// Find the post types with a regular query, I wanted everything.
$query = new WP_Query([
	'post_type' => 'post',
	'nopaging' => true,
]);

// This sample script will replace all post content with "Hello, World!";
while ($query->have_posts()) {
	// We are now in the famous WordPress loop and can use functions like get_the_ID() to refer
	// to the post in the current iteration
	$query->the_post();

	// Get the content
	$the_content = get_the_content();

	// Do something with it - you want to change this bit, obviously
	$the_content = "Hello, World!";

	// Put together an array with the post details for updating
	$newPost = [
		// Include ID to tell WP to update this post
		'ID' => get_the_ID(),
		// Set any other fields we want to change
		'post_content' => $the_content,
		// One of the plugins I had installed got confused if I didn't include
		// this in the update too
		'post_type' => 'post',
	];

	// Perform the update
	$error = wp_update_post( $newPost, true );

	// Check if we got an error
	if (is_wp_error($error)) {
		// Output any errors to the console
		print_r($error);
	}
}
// Output a new line to clear the console in case anything was output above
echo "\n";

Let me know if this boilerplate was useful and what you’ve done with it in the comments below. Any tips for improving it are also welcome!

Tags:
Category:

HTML Basics

This post intends to be a very basic introduction to HTML for people who may need to edit some code but don’t need or want to learn the everything required to build a website. If you have a WordPress site and want to make some tweaks in HTML, this is the place for you.

Terminology

Websites are built with three computer languages: HTML, CSS and JavaScript. Many other languages exist for outputting these but they all run on the server instead of in your browser and are beyond the scope of this post.

HTML is used to define different bits and content of a web page. CSS then defines how the web browser should make the HTML look (colours, layouts, fonts, sizes etc). Many websites use JavaScript to make things more interactive too.

  • HTML stands for Hyper Text Markup Language
  • CSS stands for Cascading Style Sheets
  • JavaScript is not the same as Java.

Anatomy of an HTML Tag

HTML tags are bits of code which wrap the text of the web page, they have different meanings and the CSS causes them to be displayed in different ways. HTML tags look like one of these. Pay attention to spaces and quotation marks.

  1. Self Closing: <tag_name>
  2. Simple: <tag_name>Contents<value>
  3. Regular with Attributes: <tagname attributes=”value”>Contents</tag>

Self Closing HTML Tag

Many tags don’t have any contents, they just tell the browser to do something. A classic example is a line break, if you have a paragraph (see below) and you want to force a new line somehere stick in the br tag:

 <p>The contents of the paragraph goes here<br> this text will be on a new line</p>

Simple HTML Tag

A simple HTML tag is the P tag, it defines a paragraph and you wrap it around the contents.

 <p>The contents of the paragraph goes here</p>

HTML Tag with Attributes

Another tag is the one which creates links, they’re called anchors and the tag name is a, to define where the link should point you must set the “href” attribute. Do this by adding a space after the tag name, putting the attribute name (href) followed by a space and the value for that attribute. You normally want to surround the attribute value with quotes – either single ” or double ‘ are fine.

 <a href="http://www.google.com">Click here to visit Google</a>

Simple HTML tag with CSS Class

CSS works by applying styles to HTML tags which match various types of attribute. A common one is the class. If your web developer has written code to make some links (Anchors) look like buttons you probably just need to add the right class. For example:

 <a class="button" href="http://www.google.com">Click this button to visit Google</a>

Note that you (or someone) will need to have written some CSS to make that class=”button” do anything, check with your designer/developer to find out what your options are for styling things with classes.

Tags:
Categories:

Is Quorn/Mycoprotein tested on Animals?

With Quorn releasing a vegan range of goodies this Autumn there has been lots of back and forward about whether Quorn is animal tested.

There are very few online sources for anything so I thought I’d post my modest contribution.

First, a quick clarification. Mycoprotein is a type of Fungi and the the base of Quorn. Quorn are pretty much the only company who uses Mycoprotein.

Here is The Vegan Society’s tweet which seems to be the “Yes it’s animal tested” source:

https://twitter.com/thevegansociety/status/513338247049912321

I wrote to Quorn to ask if they could comment on the tweet (since they didn’t reply to it publicly). Here’s the reply I got:

Dear Sami

Further to your recent email.

Is Mycoprotein tested on animals?

Mycoprotein was first discovered by Rank Hovis McDougall (RHM) in 1968. In order to satisfy the requirements of the Governments Ministry of Agriculture Fishery and Foods that Mycoprotein was safe for human consumption, a series of animal feeding trials were requested to be carried out.

Since 1995 there have been no further requirements for feeding trials and there are categorically no plans or requirements to carry out any additional work.

In a September 2015 statement, The Vegan Society said “It is good news that a major food manufacturer such as Quorn is seeking to meet consumer demand by producing an animal-free version of their products.”

We hope this clarifies our position.

Kind regards
Consumer Services Dept

I’ve looked but not been able to find the tweet from TVS they’ve mentioned, if I get hold of it I’ll add a link,

So yes, Quorn is animal tested, but it is no longer animal tested. So now it comes down to whether you’re happy to purchase a product with essentially a “Fixed cut off date” animal testing policy or whether you’re in the “Never Ever” animal testing group.

Before jumping to assumptions about where you’re Ideology lies work out where it actually lies, don’t boycott Quorn’s attempt to do a good thing but not every other company who has a fixed cut off date.

Read up on the different animal testing policies, look at your lifestyle, and make an educated decision. Feel free to share your thoughts in the comments below.

Tags:
Category:

Strip Images from All WordPress Posts

After importing a blog from Blogger to self-hosted WordPress recently I discovered that all the inline images remain hosted on Blogger.

There were various hacks for moving them to my local server and updating the posts and suchlike – but in my case all the posts had a single image, and the importer had managed to set that image as the featured image. So all I really wanted to do was to strip the image and leave my theme to display the featured image.

I’ve got a scripts folder in my project root for just such occasions, here’s the script I used to remove all images from all WordPress posts:

<?php
$wordpressBasePath = __DIR__.'/../public/wp-load.php';
include_once $wordpressBasePath;

$query = new WP_Query([
	'post_type' => 'post',
	'nopaging' => true,
]);

// I figured I'd also use this opportunity to make sure the post content adheres to the new blog restrictions too
// plus kses is a handy way to strip the image tags.
$allowed_tags = wp_kses_allowed_html( 'post' );
unset($allowed_tags['img']);

while ($query->have_posts()) {
	$query->the_post();
	// Everyone loves an update, especially big websites
	echo "\r".($query->current_post + 1).' of '.$query->found_posts.'. '.round((($query->current_post + 1) / $query->found_posts) * 100).'%';
	$newPost = [
		'ID' => get_the_ID(),
		'post_content' => wp_kses(get_the_content(), $allowed_tags),
	];
	$error = wp_update_post($newPost, true);
	if (is_wp_error($error)) {
		print_r($errors);
	}
}
echo "\n";

I’d like to also make this remove any empty anchor tags which get left behind (most of the images were wrapped in one) but without removing other anchors. If you have a reliable method for doing this, let me know in the comments!

Tags:
Category:

Writing Good Documentation

Writing documentation is tough, knowing what your target audience will need to be told without writing so much they won’t bother reading it isn’t easy.

Documentation writing is much like teaching  – you need a level of patience and empathy.

Patience to spend the time to understand the needs of your learners (whether they’re 11 year olds learning to code, developers learning to use your software or the end user of your product) and to spend the time and effort writing it, checking it and updating it.

Empathy to be able to put yourselves in their shoes and understand what they want and need, and how they would find it best to consume it.

Types of Documentation

Documentation tends to take two forms:

  • Inline documentation – such as labels on forms or those little question marks you can click for more details or comments in code.
  • External documentation – where you have to know where to go to look it up. Ideally the inline documentation is brief and links to a more detailed explanation in the external documentation.

Bad Documentation

A common mistake new developers make when writing code is to write comments (because they’ve been told they must write lots) which just say what the code already says. For example:

// Open the file
$file = open_file("some_file")

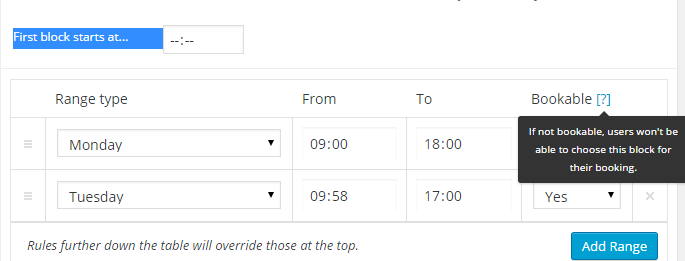
The same is often done in user interfaces, this classic example from the otherwise excellent WooCommerces Bookings extension shows the developers writing the easy documentation, but leaving the more complicated bits until later – and eventually shipping without it.

Here they’ve added an explanation to the already intuitive boolean field labelled “Bookable” but made no effort to exaplin the could-be-anything field “First block starts at…”

write-good-documentation

Good Documentation

Good documentation:

  • is consistent – whatever you’re looking up is in the same format as other similar things
  • has examples – an example is the equivalent of a picture in the expression “A picture is worth 1,000 words”
  • is open to contributions – If I find something lacking in some documentation I’m still going to figure out how to solve the problem, to allow me to feed that back into the documentation for future users is invaluable.
  • has a “see also” or “related” section, so if the bit you’re reading about isn’t quite right you can explore to the correct place.

I think that Stripe, Apache and PHP all have excellent external documentations. PHP’s default php.ini is a good example of inline documentation.

If you have more opinions, or wish to praise or insult documentations you can comment below!

Tags:
Category:

Firefox devtools.responsiveUI.presets Settings for Bootstrap 3

The ResponsiveUI tool in Firefox makes testing CSS Media Queries super easy, it comes with some presets which I’m sure mean something to somebody but since I work mostly in Bootstrap I wanted to have some easy to access Bootstrap presets in there.

Setting devtools.responsiveUI.presets

  1. In a new window or tab type about:config into the address bar and hit Enter.
  2. Heed the warning about dragons
  3. In the Search box type “responsiveUI”
  4. Double click on the preference named devtools.responsiveUI.presets and then copy & paste the code below into it.
    1. If you can’t see devtools.responsiveUI.presets either create it as a a string, or save a preset from the ResponsiveUI mode in Firefox which will create the key with a value for you to replace.
  5. Disable Responsive UI View, refresh the page, then re-enable the responsive view for the settings to take effect.

devtools.responsiveUI.presets Bootstrap Settings

Double click to select all:

[{"key": "bootstrap-xs-max","name": "Bootstrap: Extra Small Max (xs)","width": 767,"height": 1000},{"key": "bootstrap-sm-min","name": "Bootstrap: Small Min (sm)","width": 768,"height": 1000},{"key": "bootstrap-sm-max","name": "Bootstrap: Small Max (sm)","width": 991,"height": 1000},{"key": "bootstrap-md-min","name": "Bootstrap: Medium Min (md)","width": 992,"height": 1000},{"key": "bootstrap-md-max","name": "Bootstrap: Medium Max (md)","width": 1199,"height": 1000},{"key": "bootstrap-lg-min","name": "Bootstrap: Large Min (lg)","width": 1200,"height": 1000}]

Using the Bootstrap Settings

There’s a setting for the smallest and largest Bootstrap Grid breakpoints, and each one between has two – a Min and a Max – to show you the two extremes for each size band.

More devtools.responsiveUI.presets Options

Tags:
Categories:

Full Width Inline x-editable Elements

I’ve been using x-editable inline components for a project and wanted them rather than being the default tiny width they normally are, to take the full wonderful responsive width of their Bootstrap parents.

The CSS


/* Make inline editables take the full width of their parents */
.editable-container.editable-inline,
.editable-container.editable-inline .control-group.form-group,
.editable-container.editable-inline .control-group.form-group .editable-input,
.editable-container.editable-inline .control-group.form-group .editable-input textarea,
.editable-container.editable-inline .control-group.form-group .editable-input select,
.editable-container.editable-inline .control-group.form-group .editable-input input:not([type=radio]):not([type=checkbox]):not([type=submit])
{
    width: 100%;
}

This just gives 100% width to most of the containers between the editable-container and the element itself, it also excludes radio and checkbox inputs since they don’t usually want their widths playing with.

Don’t forget to include this after your xeditable CSS files.

Before x-editable full-width inline CSS

Before applying the full-width CSS

After x-editable full-width inline CSS

After applying the full-width CSS

After applying the full-width CSS

Nice and tidy, eh?

If I’ve missed anything, or you find something that this breaks – let me know in the comments!

Tags:
Categories:

Don’t be Proud of Who You Are

Nobody’s Perfect

Everyone has things about themselves that they’d like to change, that’s not a bad thing. That’s what makes good people good.

We hear a lot that we should be proud of who we are, that nobody’s perfect and that’s OK. In fact it’s often said that it’s a good thing, we should surround ourselves with people who accept us for who we are.

Load of rubbish, I say.

I say surround yourselves with people who inspire you to be a better person, good friends love you for who you are – great friends love you for what you do and how you do it.

Everyone has dreams

When I was younger, I had lots of dreams. Some were realistic – I wanted to be a chef. Some I knew would only ever be dreams – how could I be a rock star if I couldn’t play music and sing/think/tap my foot at the same time?

Over time, these dreams changed. I realised that what I really wanted, was to make the world a better place. None of this “world peace” or “free Tibet” style better, I’ve never felt qualified for those.

The handy thing about a dream like “make the world a better place” is that is got quite a lot of scope, but it’s quite simple to do. At the end of the day I realised that the best way to do my bit for world peace is to become a better person.

This has the added advantage of being rather handy in my day to day life too.

Change Yourself

So I set about becoming the Sami I wanted to be. This started in Israel, where I knew nobody and could be whoever I wanted – I could ‘try out’ different behaviours, senses of humour, and see which I felt most comfortable in. That’s not to say I wasn’t comfortable before I went, but I was certainly more happy being the post-Israel me.

That was the most important thing I’ve ever learned – that it’s OK to change. You’ll make and lose some friends along the way, but that’s going to happen anyway (because change is OK, remember?).

Ever since then, I’ve thought about who I want to be, and how I want to get there. I’ve become comfortable as myself – step one. Over the past couple of years I’ve become more organised – step two. Next up, to become work-organised (a mysterious concept known as ‘having free time’) and to become healthily-organised. That last one’s a bit of a drag, I’ve never enjoyed exercise when it’s not a by-product of the quickest way to get to the train station.

But it’ll make me a better person, which will (in it’s own tiny way) make the world a better place.

So don’t be proud of who you are, be proud of who you have made yourself – and of who you want to be.

Category: